The backup utilities in previous versions of Windows have been less than spectacular resulting in a nice market for third party applications. Today we take a look at the Backup and Restore feature in Windows 7 that may be their best backup tool yet.
Set the Backup
To set up a backup in Windows 7 open up Computer right-click on your local drive and select Properties. Then click on the Tools tab and click the Back up now button.

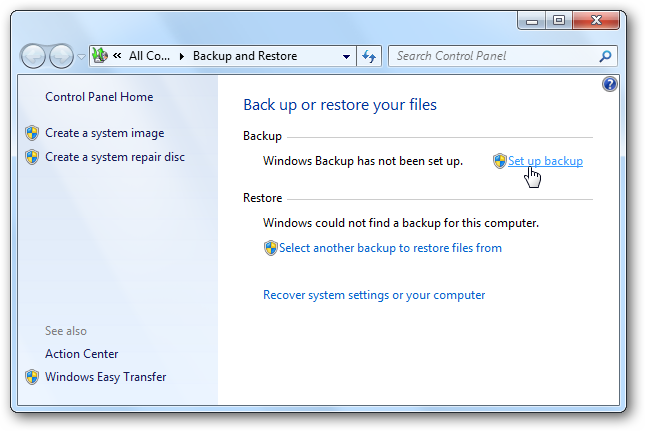
In the Back up or restore your files window click the link to set up a backup.

Windows will search for a suitable drive to store the backup or you can also choose a location on your network. If you backup to a network location you might need the password to the share.

You can have Windows choose what to backup or you can choose the files and directories. Because I like more user control for this tutorial I am choosing what to backup but it’s completely up to you.
Note: If you let Windows choose it will not backup Program Files, anything formatted with the FAT file system, files in the Recycle Bin, or any temp files that are 1GB or more.

Select the files and folder to include in the backup. Also notice you can select the option to create an image of your local drive.

Now review the backup job and make sure everything looks correct.

Here you can also schedule the days and times the backup occurs.

Save the backup settings and kick off your first backup and while it runs you can monitor the progress.

Click the View Details button to see exactly what is being backup during the process.

When the backup is complete you will see the two backup files and image folder if you created one. I backed up 20GB of data and it took around 15 minutes including the system image which came to 11GB.

Double click on the backup file and can restore files or manage the size of the backups folder.

Restore Files from Backup
If you need to go back and restore a file from a backup click on Restore my files in the Backup and Restore Center.

Now you can browse or search the most recent backup for a file or folder your missing.

Next you can restore them back to the original location or choose a different spot then click Restore.

Progress of the restoration will vary depending on the size of the data and location it’s restoring from.

Manage Backup Size
Sometimes you may need to recover some disk space and Windows 7 allows you to manage the size of your backups. In the Backup and Restore section click on the Manage Space link.

Your given a summary of the backup location and what is taking up space from the backup.

Click on the View backups button to check the different dated backups where you can delete older ones if needed.

You can also change how windows retains older system images.

Backing up data is one of the most important but overlooked tasks for a computer user. If you have another backup app you might not consider letting Windows do it, but overall, the new backup and restore utility in Windows 7 is much better than previous versions.
No comments:
Post a Comment